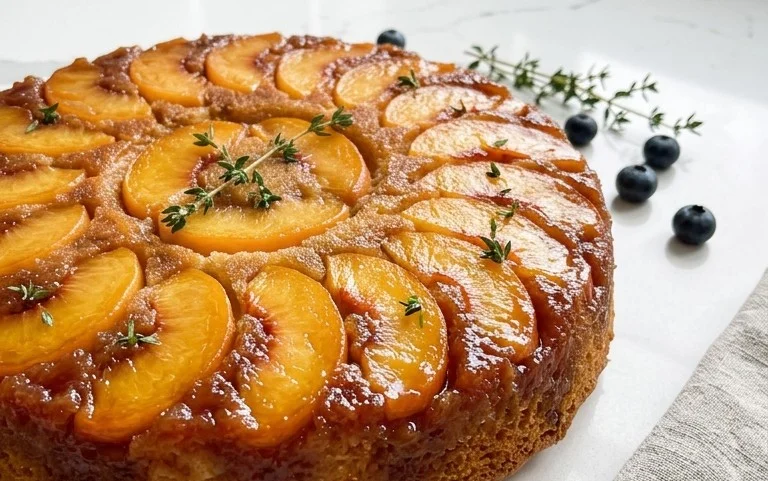
Easy Peach Upside-Down Cake Recipe
Peach upside-down cake recipe is a timeless classic for a reason, and today, we’re diving headfirst into creating a version that’s sure to become a new family favorite. There’s something undeniably magical about this dessert. The moment you flip it over to reveal those glistening, caramelized peaches, it’s a guaranteed gasp of delight. People adore peach upside-down cake for its perfect balance of sweet and tart, the tender, buttery cake, and that irresistibly gooey topping. It’s a celebration in every slice, bringin extractg warmth and sunshine to any occasion. What truly sets this particular peach upside-down cake recipe apart is the secret touch that amplifies the natural sweetness of the peaches and ensures a moist, never-dry crum extractb. Get ready to fall in love with this delightful treat all over again.
Ingredients:
A Taste of Sunshine: My Favorite Peach Upside-Down Cake
There are few desserts that evoke the warmth and sweetness of summer quite like a perfectly baked peach upside-down cake. The vibrant, caramelized peaches nestled beneath a tender, golden cake create a visual and culinary masterpiece that’s surprisingly easy to whip up. This recipe is my go-to for a reason – it’s consistently delicious, uses simple ingredients, and always impresses. The magic happens when you invert the warm cake, revealing a glistening layer of sweet, fruity goodness that’s been kissed by the heat. Get ready to fill your kitchen with an irresistible aroma and your table with a dessert that’s pure sunshine.
This cake is a wonderful way to celebrate the peak season of peaches, but don’t despair if they’re not readily available. Frozen or canned peaches (drained very well) can also be used in a pinch, though fresh will always yield the best flavor and texture. The process is straightforward, focusing on creating a luscious topping that becomes the star of the show when revenon-alcoholic aled.
Preparing the Glorious Peach Topping
The foundation of any great upside-down cake is its topping, and our peach topping is no exception. This is where the magic truly begin extracts to happen, transforming simple ingredients into a sticky, sweet, and wonderfully fragrant layer.
1. Begin extract by preparing your peaches. To do this, you’ll want to peel them. A quick way to do this is to score an “X” on the bottom of each peach, then blanch them in boiling water for about 30-60 seconds, followed by an ice bath. The skins should then slip off easily. Halve your peaches, remove the pits, and slice them into generous wedges. We’re aiming for slices that are about 1/2 inch thick, large enough to hold their shape during baking but thin enough to become tender and slightly jammy. You should have around 2 cups of sliced peaches.
2. In a medium saucepan, melt the 6 tablespoons of salted butter over medium heat. Once the butter is melted and slightly foamy, stir in the 2/3 cup of packed brown sugar and the 1/4 teaspoon of cinnamon. Continue to cook, stirring occasionally, for about 2-3 minutes, until the sugar is dissolved and the mixture is smooth and fragrant. This creates a rich, caramelly base that will coat the peaches beautifully.
3. Carefully arrange your prepared peach slices in a single layer over the brown sugar mixture in the saucepan. Try to pack them in snugly, as they will shrink slightly during baking. You want a beautiful, even layer that will showcase the fruit when the cake is inverted. Set this saucepan aside.
Crafting the Tender Cake Batter
While the peach topping is getting acquainted, we’ll prepare the cake batter that will perfectly complement the sweet fruit. This is a simple, classic cake batter that bakes up light and moist, creating a delightful contrast to the caramelized peaches.
4. In a medium bowl, whisk together the 1 1/4 cups of flour, 1/4 teaspoon of baking powder, and 1/4 teaspoon of salt. This dry mixture will form the structure of our cake.
5. In a separate large bowl, cream together the 1/2 cup of softened butter and 3/4 cup of sugar using an electric mixer (or a whisk and some elbow grease) until the mixture is light and fluffy. This process incorporates air, which is crucial for a tender cake.
6. Beat in the 1 egg and 1 teaspoon of vanilla extract until well combined. The vanilla adds a lovely aroma and depth of flavor.
7. Gradually add the dry ingredients to the wet ingredients, alternating with the 1/2 cup of milk, begin extractning and ending with the dry ingredients. Mix on low speed (or by hand) until just combined. Be careful not to overmix the batter; this can result in a tough cake. You want to see just a few streaks of flour remaining before you stop mixing. The batter should be smooth and pourable.
Bringin extractg It All Together and Baking to Perfection
Now comes the exciting part: combining the topping and the batter, and then baking this delightful creation.
8. Preheat your oven to 350 degrees Fahrenheit (175 degrees Celsius). Grease a 9-inch round cake pan generously with butter or cooking spray. This step is crucial to ensure the cake releases easily after baking.
9. Pour the peach topping mixture (butter, brown sugar, and cinnamon) directly into the prepared cake pan. Then, carefully arrange the peach slices in a single layer on top of the brown sugar mixture, creating your desired pattern. Try to avoid overlapping the slices too much.
10. Gently pour the cake batter evenly over the peaches and brown sugar mixture. Use a spatula to spread the batter to the edges of the pan, ensuring it covers all the fruit.
11. Bake for 35-45 minutes, or until a wooden skewer or toothpick inserted into the center of the cake comes out clean. The cake should be golden brown and a delightful aroma should fill your kitchen.
12. Once baked, let the cake cool in the pan on a wire rack for about 10-15 minutes. This resting period is important; it allows the topping to settle slightly and makes inversion easier.
13. To invert the cake, carefully run a knife around the edges of the pan to loosen it. Place a serving plate (one that is larger than the cake pan) upside down over the cake pan. Then, with oven mitts, carefully and confidently flip the pan and plate over together. Lift off the cake pan slowly. If any peaches stick to the pan, gently reposition them on the cake.
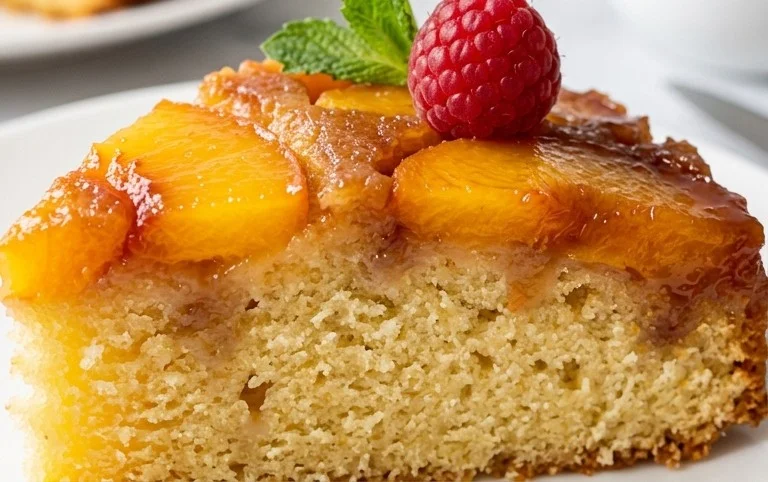
Serve this glorious Peach Upside-Down Cake warm, perhaps with a dollop of whipped cream or a scoop of vanilla ice cream. Each bite is a sweet, tender, and fruity delight that will transport you straight to a summer afternoon. Enjoy every delicious moment!
Conclusion:
I truly hope you’ll give this delightful Peach Upside-Down Cake Recipe a try! It’s a fantastic dessert because it’s surprisingly simple to make, yet delivers an impressive presentation and an explosion of sweet, caramelized peach flavor. The moist cake beautifully complements the tender, syrupy fruit topping, making it a perfect treat for any occasion, from a casual family dinner to a more special gathering. This cake is wonderfully versatile; I love serving it warm with a scoop of vanilla bean ice cream or a dollop of freshly whipped cream. For a touch of elegance, a sprinkle of chopped toasted pecans on top adds a lovely crunch and nutty dimension. Don’t be afraid to experiment with variations, either! While peaches are divine, you could try this with other stone fruits like apricots or plums, or even use canned pineapple rings for a tropical twist. The caramelization process is key, so be patient and let that sugary goodness develop. This cake is a testament to how simple ingredients can create something truly spectacular. So, gather your ingredients and get ready to bake up a little slice of sunshine!
Frequently Asked Questions:
Can I use fresh peaches when they are not in season?
Absolutely! If fresh peaches aren’t readily available or at their peak, you can certainly use frozen or canned sliced peaches. If using frozen, thaw them completely and drain off any excess liquid before using them in the caramel topping. For canned peaches, drain them very well to prevent the topping from becoming too watery.
My caramel is burning, what should I do?
If you notice your caramel is darkening too quickly, it’s best to remove the pan from the heat immediately. The residual heat will continue to cook it slightly. You can also add a tiny splash of water or lemon juice to stop the caramelization process if it’s progressing too rapidly. Keep a close eye on it throughout the cooking time!
How should I store leftover Peach Upside-Down Cake?
Leftover cake can be stored at room temperature, covered tightly, for up to two days. For longer storage, or if your kitchen is particularly warm, I recommend refrigerating it. It’s delicious served cold, but I find it’s best when gently rewarmed in the oven or microwave for a few seconds to bring back that lovely soft texture and warm peach flavor.
Peach Upside-Down Cake
A classic peach upside-down cake with a sweet caramel topping and a tender cake base.
Ingredients
-
6 tablespoons salted butter, for topping
-
2/3 cup packed brown sugar
-
1/4 teaspoon cinnamon
-
3 large peaches, peeled and sliced (about 2 cups)
-
1 1/4 cups flour
-
1/4 teaspoon baking powder
-
1/4 teaspoon salt
-
1/2 cup butter, softened, for cake
-
3/4 cup sugar
-
1 egg
-
1 teaspoon vanilla extract
-
1/2 cup milk
Instructions
-
Step 1
Preheat oven to 350°F (175°C). Grease a 9-inch round cake pan. -
Step 2
For the topping: Melt 6 tablespoons of butter in the prepared cake pan over low heat (or melt in a separate small saucepan and pour into pan). Stir in brown sugar and cinnamon until combined. Arrange peach slices evenly over the sugar mixture. -
Step 3
For the cake: In a medium bowl, whisk together flour, baking powder, and salt. -
Step 4
In a large bowl, cream together 1/2 cup softened butter and 3/4 cup sugar until light and fluffy. Beat in the egg and vanilla extract. -
Step 5
Alternately add the dry ingredients and milk to the butter mixture, beginning and ending with the dry ingredients. Mix until just combined. -
Step 6
Gently pour the cake batter over the peaches in the prepared pan. -
Step 7
Bake for 35-45 minutes, or until a wooden skewer inserted into the center comes out clean. -
Step 8
Let the cake cool in the pan for 10 minutes before inverting it onto a serving plate.
Important Information
Nutrition Facts (Per Serving)
It is important to consider this information as approximate and not to use it as definitive health advice.
Allergy Information
Please check ingredients for potential allergens and consult a health professional if in doubt.