Rainbow-Filled Doughnuts- Vibrant Treat Recipe
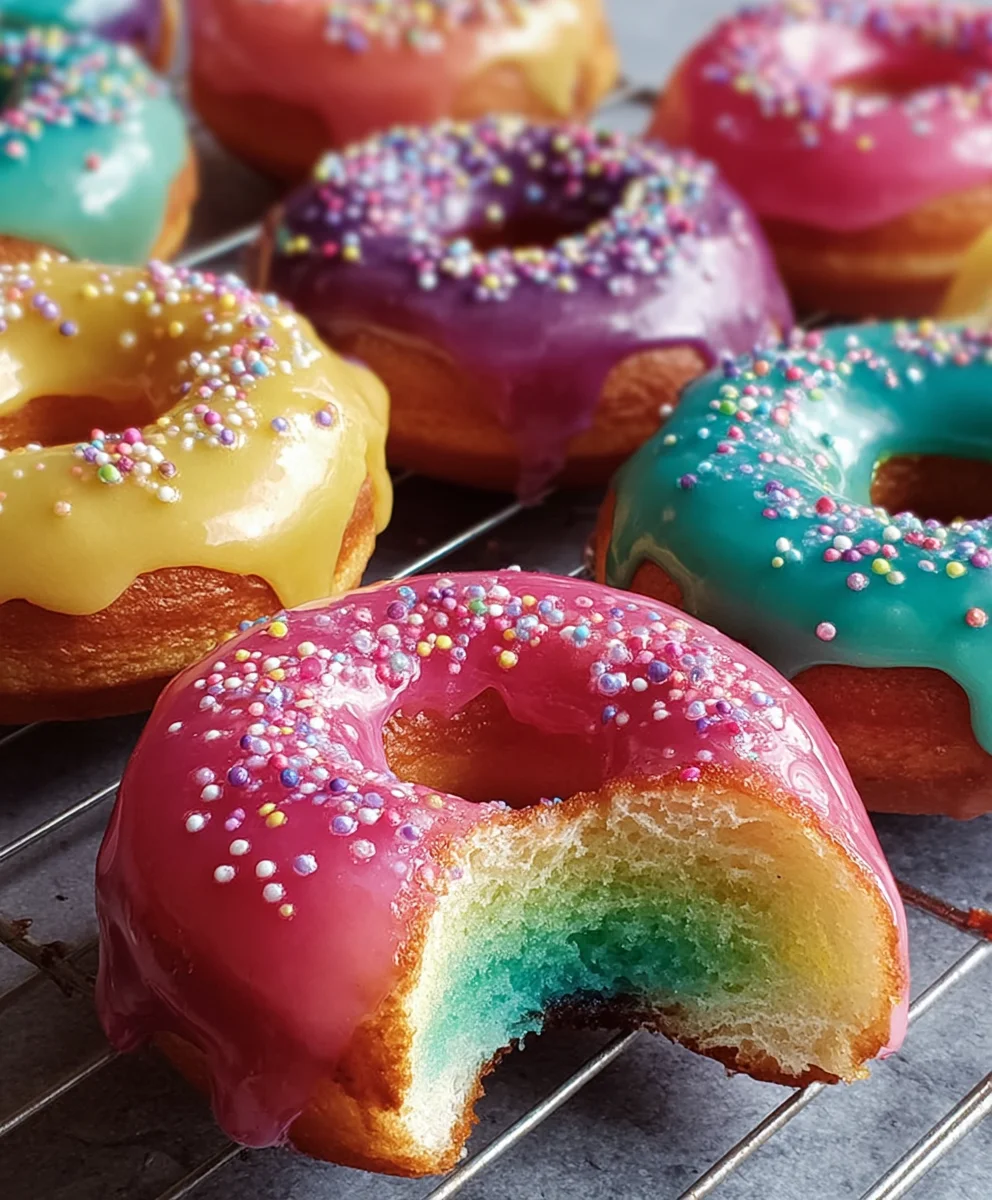
Rainbow-Filled Doughnuts are more than just a sweet treat; they’re a vibrant explosion of joy in every bite, a knon-alcoholic aleidoscope of color and flavor that instantly elevates any occasion. We all love doughnuts, that classic comfort food that brings a smile to faces of all ages. But what truly sets these Rainbow-Filled Doughnuts apart is the magical surprise waiting within. Imagin extracte biting through a perfectly crisp, golden exterior to discover a luscious, swirling filling of jewel-toned fruit purees, each color offering a distinct yet harmonious burst of sweetness. It’s this unexpected, delightful revelation that makes them a showstopper, transforming a simple pastry into an edible work of art. Get ready to create a dessert that’s as visually stunning as it is delicious, guaranteed to be the highlight of your dessert table and leave everyone marveling at your culinary creativity.
Ingredients:
- 2 tablespoons active dry yeast
- ½ cup warm water (105-110°F)
- 1 teaspoon granulated sugar (for yeast activation)
- 2½ cups all-purpose flour
- ¼ cup granulated sugar
- 2 large eggs
- 2 tablespoons unsalted butter, softened to room temperature
- 2 teaspoons salt
- Canola oil, for deep frying
- 1½ cups confectioner’s sugar
- ½ cup whipping cream
- Rainbow sprinkles, for vibrant decoration
- 2½ cups vanilla pudding
- Rainbow food coloring (in individual containers for red, orange, yellow, green, blue, and purple)
Preparing the Dough
Step 1: Blooming the Yeast
To start crafting these delightful Rainbow-Filled Doughnuts, the very first step is to awaken your yeast. In a small bowl, combine the warm water (ensure it’s between 105-110°F – too hot and you’ll kill the yeast, too cool and it won’t activate) with the 1 teaspoon of granulated sugar and the 2 tablespoons of active dry yeast. Give it a gentle stir to combine. Let this mixture sit undisturbed for about 5 to 10 minutes. You’ll know the yeast is alive and ready to go when it becomes foamy and bubbly on the surface, looking almost like a creamy froth. This tells us our yeast is active and eager to leaven our doughnut dough. If you don’t see this bubbling action, it’s a good indicator that your yeast might be old or the water temperature was off, and you’ll need to start this step again with fresh yeast.
Step 2: Mixing the Dough Ingredients
Once your yeast has bloomed, it’s time to bring all the other dough ingredients together. In a large mixing bowl, or the bowl of your stand mixer fitted with a dough hook, combine the 2½ cups of all-purpose flour, ¼ cup of granulated sugar, and the 2 teaspoons of salt. Whisk them together briefly to distribute the salt and sugar evenly through the flour. Next, create a well in the center of the dry ingredients. Pour in the activated yeast mixture, the 2 large eggs, and the 2 tablespoons of softened unsalted butter.
Step 3: Kneading the Dough
Now, it’s time to develop the gluten, which will give our doughnuts that classic fluffy and tender texture. If you’re using a stand mixer, start mixing on low speed until the ingredients just come together. Then, increase the speed to medium and knead for about 6 to 8 minutes. The dough should become smooth, elastic, and pull away cleanly from the sides of the bowl. If you’re kneading by hand, turn the dough out onto a lightly floured surface and knead for about 10 to 12 minutes. Push the dough away from you with the heel of your hand, then fold it back over itself and repeat. It will be sticky at first, but resist the urge to add too much extra flour; keep kneading, and it will become manageable.
Step 4: First Rise (Proofing)**
Lightly grease a clean large bowl with a little bit of oil or cooking spray. Place the kneaded dough into the bowl, turning it once to coat the entire surface with oil. This prevents a dry skin from forming. Cover the bowl tightly with plastic wrap or a clean, damp kitchen towel. Find a warm, draft-free spot in your kitchen for the dough to rise. This could be inside a slightly warmed oven (turned off!), on top of your refrigerator, or simply on the counter if your kitchen is warm enough. Let the dough rise for about 1 to 1½ hours, or until it has doubled in size. This process is crucial for flavor development and achieving that airy texture.
Shaping and Frying the Doughnuts
Step 5: Shaping and Second Rise**
Once the dough has doubled, gently punch it down to release the air. Turn the dough out onto a lightly floured surface. You can roll the dough out to about ½-inch thickness, then use a doughnut cutter to create your shapes. Alternatively, you can divide the dough into smaller portions and roll them into balls, then use your thumb to make a hole in the center, stretching it out to form a ring. Place the shaped doughnuts onto parchment-lined baking sheets, ensuring they have a little space between them. Cover them loosely with plastic wrap and let them rise for another 30 to 45 minutes, or until they look puffy. This second rise, known as proofing, is essential for light and airy doughnuts.
Preparing the Fillings and Glaze
Step 6: Frying the Doughnuts**
While the doughnuts are undergoing their second rise, set up your frying station. Pour enough canola oil into a deep, heavy-bottomed pot or Dutch oven to reach a depth of about 3 inches. Heat the oil over medium-high heat until it reaches 360-370°F. Use a candy thermometer to monitor the temperature accurately; this is key for perfectly fried doughnuts. Carefully slide 2 to 3 doughnuts at a time into the hot oil, being careful not to overcrowd the pot, which can lower the oil temperature. Fry for about 1 to 2 minutes per side, until they are golden brown and puffed up. Use a slotted spoon or spider strainer to carefully remove the doughnuts from the oil and place them on a wire rack set over paper towels to drain any excess oil.
Step 7: Creating the Rainbow Fillings**
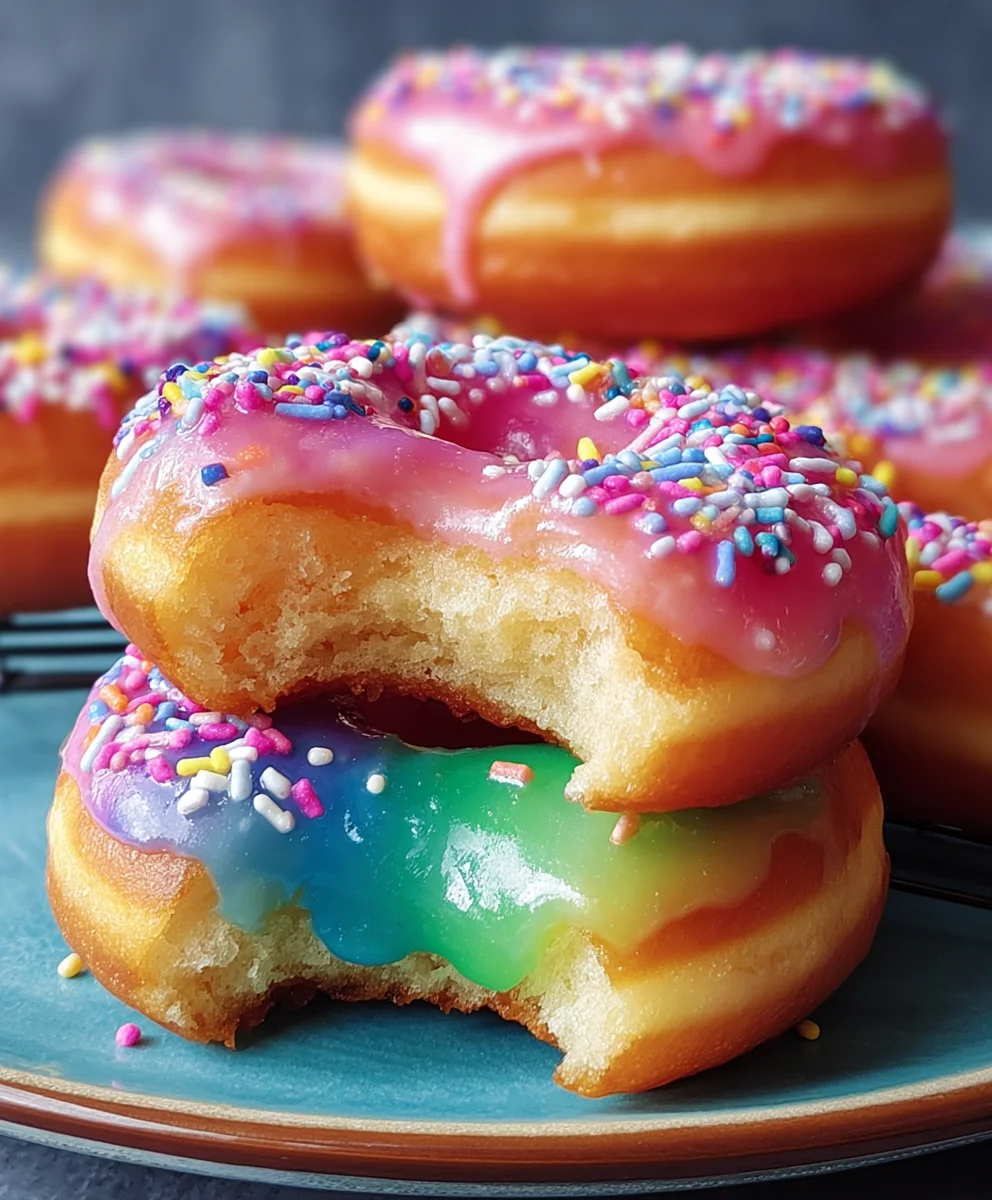
This is where the magic of our Rainbow-Filled Doughnuts truly comes alive! In a medium bowl, stir together the 2½ cups of vanilla pudding with the ½ cup of whipping cream until smooth and well combined. Now, divide this pudding mixture into six smaller, equal portions, one for each color of the rainbow. Add a few drops of each food coloring (red, orange, yellow, green, blue, purple) to its respective portion of pudding, stirring gently until the color is uniform. You want vibrant, distinct colors. You can adjust the amount of food coloring to achieve your desired intensity. Pour each colored pudding mixture into a separate piping bag or a resealable plastic bag with a corner snipped off.
Step 8: Glazing the Doughnuts**
While the doughnuts are still slightly warm (but not hot), prepare your glaze. In a medium bowl, whisk together the 1½ cups of confectioner’s sugar with about 2 to 3 tablespoons of milk or water, adding just enough liquid to create a smooth, pourable glaze. You’re looking for a consistency that will coat the doughnuts nicely without being too thin. Dip the tops of each cooled doughnut into the glaze, allowing any excess to drip back into the bowl. As soon as they are glazed, immediately sprinkle them generously with the rainbow sprinkles while the glaze is still wet. This ensures the sprinkles adhere perfectly.
Step 9: Filling the Doughnuts**
Once the glaze has set slightly, it’s time to fill these beauties. Gently insert the tip of your piping bag (filled with one of the colored pudding mixtures) into the side of each doughnut. Squeeze gently to fill the doughnut with the pudding. Alternate through the different colors to create a beautiful, layered rainbow effect inside. You can also choose to fill them with just one color if you prefer. The more pudding you add, the more decadent the filling will be! These Rainbow-Filled Doughnuts are now ready to be enjoyed in all their vibrant glory.
Conclusion:
And there you have it! You’ve now got the power to create your very own stunning and delicious Rainbow-Filled Doughnuts. We’ve walked through each step together, from preparing the vibrant, colorful dough to filling them with that delightful surprise. The joy of making these is only matched by the sheer delight of sharing them. They’re perfect for brightening up any occasion, from birthday parties to a simple weekend treat that’ll make everyone smile.
Serve your Rainbow-Filled Doughnuts warm and fresh. They are absolutely divine on their own, but consider pairing them with a glass of cold milk or a steaming cup of coffee. For a little extra flair, a dusting of powdered sugar or a drizzle of white chocolate glaze can elevate them even further. Don’t be afraid to get creative with the fillings too! While our recipe uses a classic vanilla cream, feel free to experiment with fruit compotes, chocolate ganache, or even a cream cheese frosting.
Remember, the kitchen is a place for exploration and fun. Embrace the process, and don’t worry if your first batch isn’t perfect – each attempt will bring you closer to doughnut perfection. The vibrant colors and sweet surprise inside these Rainbow-Filled Doughnuts are sure to be a hit with family and friends. Happy baking!
FAQs
Can I make the dough ahead of time?
Yes, you can prepare the dough a day in advance. After kneading, place it in a lightly oiled bowl, cover tightly with plastic wrap, and refrigerate. Allow it to come to room temperature for about an hour before shaping and proceeding with the recipe.
What if I don’t have food coloring? Can I use natural alternatives?
While artificial food coloring provides the most vibrant and distinct colors, you can experiment with natural alternatives like pureed berries (for pink/red), spinach (for green), or turmeric (for yellow). Keep in mind that natural colorings may subtly alter the flavor and might not be as intensely colored.
How should I store leftover Rainbow-Filled Doughnuts?
Store any uneaten Rainbow-Filled Doughnuts in an airtight container at room temperature for up to two days. For longer storage, you can refrigerate them, but they may lose some of their freshness. It’s best to enjoy them within a day or two for optimal taste and texture.
Rainbow-Filled Doughnuts – Vibrant Treat Recipe
Delight in these visually stunning and delicious rainbow-filled doughnuts, perfect for any celebration.
Ingredients
-
2 tablespoons active dry yeast
-
½ cup warm water (105-110°F)
-
1 teaspoon granulated sugar (for yeast activation)
-
2½ cups all-purpose flour
-
¼ cup granulated sugar
-
2 large eggs
-
2 tablespoons unsalted butter, softened to room temperature
-
2 teaspoons salt
-
Canola oil, for deep frying
-
1½ cups confectioner’s sugar
-
½ cup whipping cream
-
Rainbow sprinkles, for vibrant decoration
-
2½ cups vanilla pudding
-
Rainbow food coloring (red, orange, yellow, green, blue, and purple)
Instructions
-
Step 1
Bloom the yeast by combining warm water, 1 teaspoon sugar, and active dry yeast in a bowl. Let sit for 5-10 minutes until foamy. -
Step 2
In a large bowl, whisk together flour, ¼ cup sugar, and salt. Add the bloomed yeast mixture, eggs, and softened butter. -
Step 3
Knead the dough until smooth and elastic, about 6-8 minutes in a stand mixer or 10-12 minutes by hand. -
Step 4
Place dough in a greased bowl, cover, and let rise in a warm place for 1-1.5 hours until doubled in size. -
Step 5
Punch down dough, shape into doughnuts, place on parchment-lined baking sheets, cover, and let rise for another 30-45 minutes. -
Step 6
Fry doughnuts in 3 inches of canola oil heated to 360-370°F for 1-2 minutes per side until golden brown. Drain on a wire rack. -
Step 7
Prepare rainbow fillings by dividing vanilla pudding and whipping cream mixture into six bowls. Tint each with a different food coloring. Pour into piping bags. -
Step 8
Make glaze by whisking confectioner’s sugar with 2-3 tablespoons of milk or water until smooth and pourable. Dip cooled doughnuts into glaze and immediately sprinkle with rainbow sprinkles. -
Step 9
Once glaze is set, carefully fill doughnuts with the colored pudding mixtures using piping bags, alternating colors for a rainbow effect.
Important Information
Nutrition Facts (Per Serving)
It is important to consider this information as approximate and not to use it as definitive health advice.
Allergy Information
Please check ingredients for potential allergens and consult a health professional if in doubt.