Easy Rice Krispie Wreaths Festive Holiday Treats
Rice Krispie Wreaths are more than just a sweet treat; they’re a nostalgic whisper of childhood holidays, a symbol of simple joys, and a delightful centerpiece for any festive gathering. There’s a universally loved magic to these iconic holiday shapes, and it’s easy to see why. The irresistible combination of crispy cereal, gooey marshmallows, and a hint of buttery sweetness creates a texture and flavor profile that’s utterly addictive. What truly makes Rice Krispie Wreaths special is their incredible versatility and the sheer fun they bring to the kitchen. They’re a perfect activity for families to create together, a blank canvas for festive decorations, and a guaranteed crowd-pleaser that brings smiles to faces of all ages. Whether you’re looking to recreate cherished memories or start new traditions, these delightful wreaths are sure to add a touch of sparkle and deliciousness to your celebrations.

Ingredients:
- 3 tablespoons butter
- 10 ounces marshmallows (this is roughly 40 large marshmallows, or about 4 cups of mini marshmallows)
- 6 cups Rice Krispies cereal
- Green food coloring (gel food coloring works best for vibrant color and minimal liquid)
- Red and green M&Ms (or similar small, round candies like red hots or sprinkles)
- Cooking spray or softened butter for greasing your hands
Preparing Your Workspace and Ingredients
Before we dive into the fun part, it’s essential to get our workspace ready. This recipe can be a little sticky, so being prepared will make the process much smoother. First, find a large mixing bowl. A big stainless steel or heat-resistant plastic bowl is ideal for holding the melted marshmallows and cereal mixture. Next, lay out a sheet of parchment paper or wax paper on a clean countertop or baking sheet. This will be where we shape our Rice Krispie Wreaths. Alternatively, you can use a lightly greased baking sheet.
Now, let’s get our ingredients prepped. Measure out your 6 cups of Rice Krispies cereal and have it ready to go. Having everything measured and within reach before you start melting the marshmallows is key to success. This is because once the marshmallows are melted, you need to work relatively quickly to combine everything before the mixture starts to harden. Also, ensure your green food coloring is easily accessible. You’ll want to add it at the right moment to achieve a beautiful, even green color throughout the wreaths. Have your red and green M&Ms sorted and ready for decorating.
Melting the Marshmallows and Adding Color
In your large mixing bowl, add the 3 tablespoons of butter. Place this bowl over a saucepan filled with about an inch of simmering water, creating a double boiler. This gentle heating method prevents the marshmallows from scorching. Stir the butter occasionally until it’s completely melted. Once the butter is melted, add the 10 ounces of marshmallows to the bowl. Continue stirring gently and consistently over the simmering water. You’ll notice the marshmallows gradually begin extract to soften and melt. Keep stirring until the mixture is smooth and there are no lumps remaining. This process usually takes about 5-8 minutes.
As soon as the marshmallows are completely melted and smooth, remove the bowl from the heat. Now it’s time to add our color! Carefully add a few drops of green food coloring to the melted marshmallow mixture. Start with a small amount, perhaps 5-10 drops, and stir vigorously. You’re looking for a vibrant green hue. If the color isn’t as intense as you’d like, add a few more drops at a time, stirring thoroughly after each addition, until you achieve your desired shade. Remember that the color will lighten slightly when the cereal is added, so don’t be afraid to go a little bolder than you think you need to. Gel food coloring is highly recommended here as it provides a concentrated color without adding too much liquid, which could affect the texture of your wreaths.
Combining Cereal and Shaping the Wreaths
Once the marshmallow mixture is a beautiful, even green, it’s time to add the Rice Krispies cereal. Add the 6 cups of Rice Krispies cereal to the bowl with the melted green marshmallows. Using a sturdy spatula or a large spoon, gently but thoroughly fold the cereal into the marshmallow mixture. Continue folding until every single piece of cereal is coated in the gooey green marshmallow. This is where working quickly is important. You want the mixture to be pliable enough to shape but not so sticky that it becomes unmanageable. If the mixture starts to harden before you’ve finished coating all the cereal, you can briefly return the bowl to the double boiler for a few seconds to re-soften it, but be careful not to overheat.
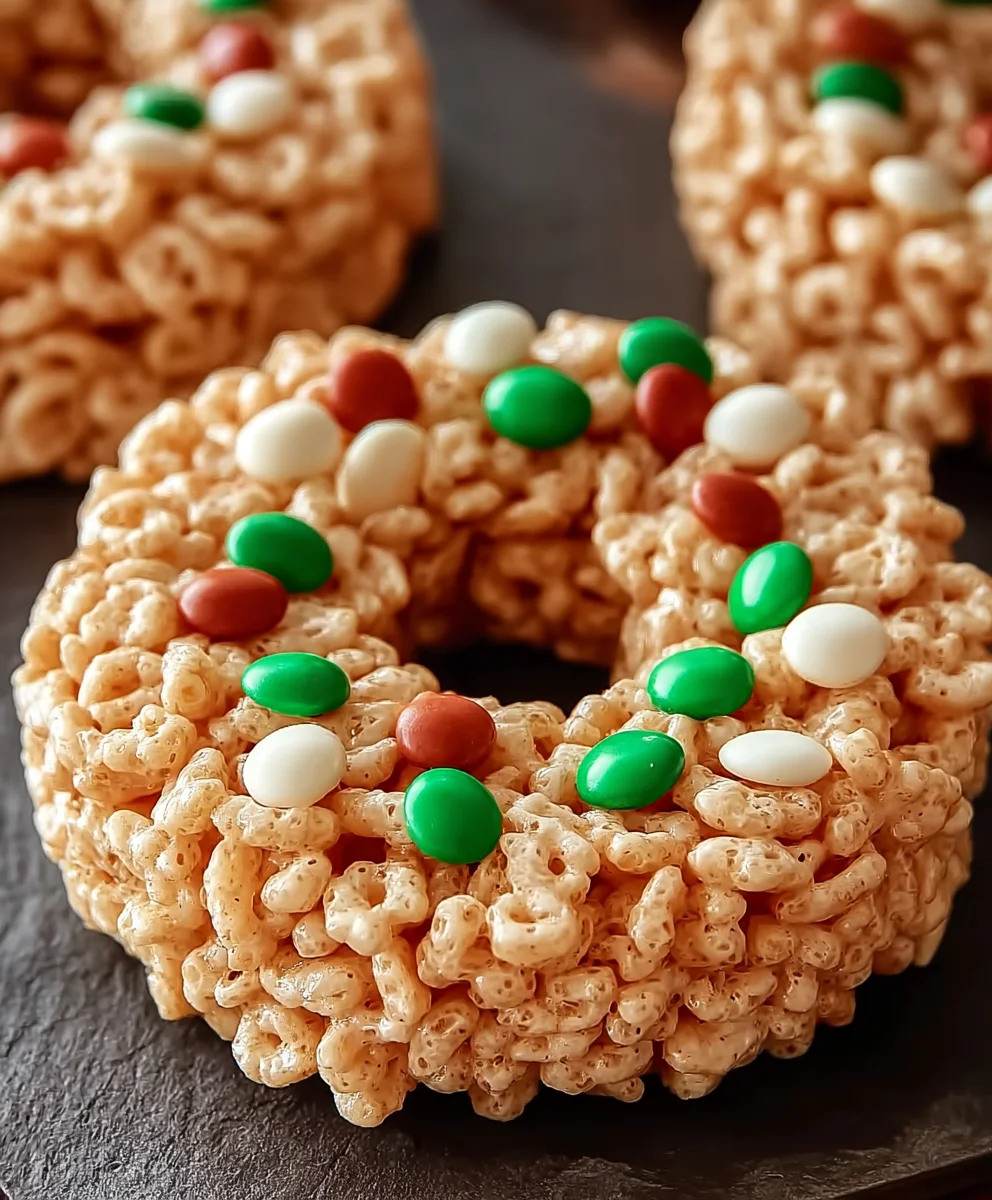
Now for the fun part – shaping! Lightly grease your hands with cooking spray or softened butter. This is a crucial step to prevent the sticky marshmallow mixture fgin extract clinging to your hands. Take a generous handful of the Rice Krispie mixture, about what you can comfortably hold. Roll it into a ball, then flatten it slightly. Gently press your thumb or finger into the center of the flattened ball to create a hole, forming a wreath shape. Aim for a thickness of about half an inch. Place the shaped wreath onto your prepared parchment paper or wax paper. Repeat this process with the remaining mixture, creating as many wreaths as you can. You can adjust the size of your wreaths by using more or less of the mixture.
Decorating Your Rice Krispie Wreaths
With your wreaths shaped and still slightly warm and pliable, it’s time to add the festive decorations. Gather your red and green M&Ms. Gently press the M&Ms into the surface of the Rice Krispie Wreaths. You can arrange them in a pattern, like creating “holly berries” with red M&Ms and perhaps some green ones to mimic leaves, or you can simply scatter them randomly for a festive sparkle. Let your creativity shine! If you prefer, you can also use other small candies or sprinkles for decoration. Think red hots for a pop of color, or green and red sprinkles for a classic holiday look.
Allow the Rice Krispie Wreaths to cool completely on the parchment paper or wax paper. This cooling process is essential for them to firm up and hold their shape. Once they are fully set and firm to the touch, they are ready to be served or stored. If you wish to store them, place them in an airtight container at room temperature. They will stay fresh for up to 3-4 days. Enjoy these delightful and easy-to-make Rice Krispie Wreaths as a fun holiday treat for parties, classroom events, or just a special afternoon snack!
Conclusion:
There you have it – a simple yet utterly delightful recipe for Rice Krispie Wreaths that’s perfect for any occasion, especially the holidays! We’ve walked through the steps together, and I truly hope you enjoy creating and sharing these sweet, crunchy treats. Their versatility makes them a fantastic addition to any dessert table, whether you’re hosting a festive gathering or just looking for a fun afternoon activity with loved ones. Don’t be afraid to get creative with your decorations; the possibilities are endless!
For serving, these Rice Krispie Wreaths are wonderful on their own, but they also pair beautifully with a glass of cold milk, hot cocoa, or even a scoop of ice cream. Consider them as edible decorations for your holiday table or as charming party favors. As for variations, feel free to experiment with different food colorings to match any theme, or incorporate sprinkles and edible glitter for extra sparkle. You can also dip them partially in melted chocolate for a decadent touch. I encourage you to embrace the fun and make these Rice Krispie Wreaths your own!
Frequently Asked Questions:
Q: How do I prevent the Rice Krispie mixture from sticking to my hands when shaping the wreaths?
A: A little bit of butter or cooking spray on your hands will be your best friend here! Lightly coat your palms before you start shaping the mixture. This creates a non-stick barrier and makes the process much smoother. You can also keep a small bowl of butter or cooking spray nearby to reapply as needed.
Q: Can I make Rice Krispie Wreaths ahead of time?
A: Absolutely! Rice Krispie Wreaths can be made up to two days in advance. Store them in an airtight container at room temperature. If you’ve decorated them with frosting or candies that might melt, it’s best to wait to decorate until closer to serving time to maintain their pristine appearance.
Easy Rice Krispie Wreaths Festive Holiday Treats
Festive and easy-to-make Rice Krispie treats shaped into holiday wreaths and decorated with colorful candies.
Ingredients
-
3 tablespoons butter
-
10 ounces marshmallows (about 40 large marshmallows)
-
6 cups Rice Krispies cereal
-
Green food coloring
-
Red and green M&Ms
-
Cooking spray or softened butter for greasing hands
Instructions
-
Step 1
Prepare your workspace by laying out parchment paper or a greased baking sheet. Measure out cereal and have food coloring and candies ready. -
Step 2
Melt butter in a double boiler. Add marshmallows and stir until completely smooth and melted. Remove from heat. -
Step 3
Add green food coloring to the melted marshmallows, starting with a few drops and stirring until a vibrant green hue is achieved. Gel food coloring is recommended. -
Step 4
Add Rice Krispies cereal to the green marshmallow mixture and gently fold until all cereal is evenly coated. Work quickly. -
Step 5
Grease your hands with cooking spray or butter. Take handfuls of the mixture, roll into balls, flatten slightly, and press a thumb into the center to create a wreath shape. Place on prepared surface. -
Step 6
While wreaths are still pliable, gently press red and green M&Ms into the surface for decoration. Arrange as desired. -
Step 7
Allow wreaths to cool completely until firm. Store in an airtight container at room temperature for up to 3-4 days.
Important Information
Nutrition Facts (Per Serving)
It is important to consider this information as approximate and not to use it as definitive health advice.
Allergy Information
Please check ingredients for potential allergens and consult a health professional if in doubt.