Dark Chocolate Sea Salt Nut Bars-Easy Treat
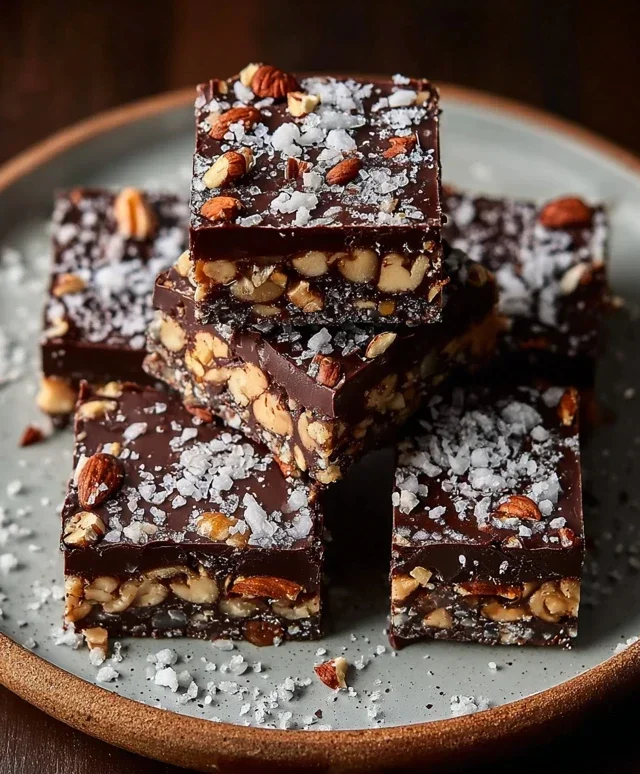
Dark Chocolate and Sea Salt Nut Bars are a symphony of textures and tastes, a delightful dance between the bitter richness of dark chocolate and the surprising pop of sea salt. Honestly, these aren’t just any snack; they’re a little slice of heaven that I find myself craving constantly. What’s not to love? They offer that satisfying crunch from a medley of nuts, a chewy sweetness that balances the intense chocolate, and that addictive salty finish that just keeps you coming back for more. These Dark Chocolate and Sea Salt Nut Bars are my go-to for an afternoon pick-me-up, a post-workout reward, or even a simple treat to share with friends. They’re incredibly satisfying without being overwhelmingly decadent, making them a truly special indulgence that’s surprisingly easy to make at home.
Get ready to experience
The perfect blend of sweet and salty.
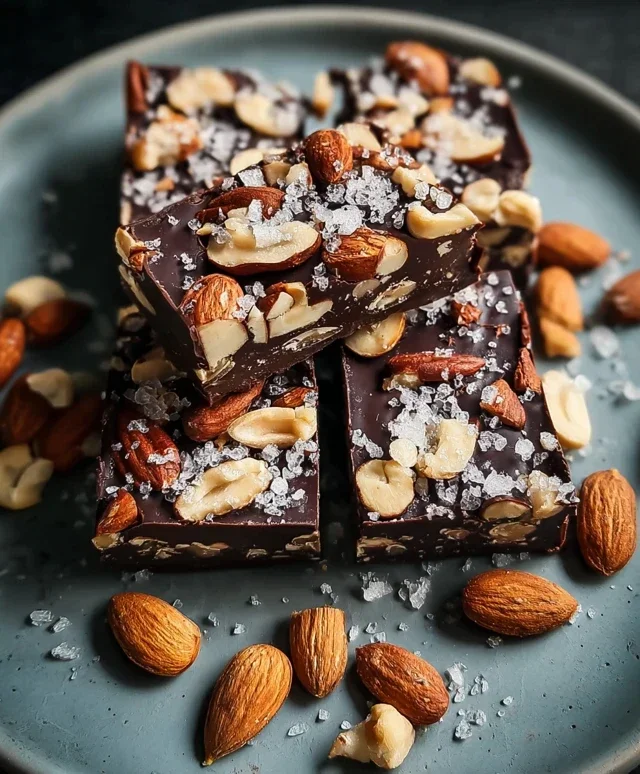
The Perfect Blend: Dark Chocolate and Sea Salt Nut Bars
If you’re anything like me, you often crave that perfect balance of sweet, salty, and a satisfying crunch. Store-bought energy bars can be hit or miss, often packed with questionable ingredients or simply not hitting that flavor sweet spot. That’s where these Dark Chocolate and Sea Salt Nut Bars come in. They are incredibly easy to make, incredibly delicious, and incredibly customizable. I love having a batch of these on hand for a quick breakfast, an afternoon pick-me-up, or even a healthy-ish dessert. The combination of rich dark chocolate and a hint of flaky sea salt with the earthy crunch of nuts is simply divine. Plus, the chewy, slightly sweet binding agent means they hold together beautifully without any baking required. Get ready to ditch the processed stuff and embrace your inner chocolatier and baker!
Ingredients:
Preparation Steps
Now, let’s get down to business and create these delightful bars. Don’t be intimidated by the steps; they are straightforward and designed for success.
1. Prepare Your Nuts: The first step is to get your nuts ready. If you’re using a pre-mixed variety, you can skip this. However, if you’re using whole nuts like almonds or cashews, I recommend giving them a rough chop. You want them to be in bite-sized pieces, not dust. This ensures you get a good textural element in every bite. You can do this by hand with a sharp knife on a cutting board, or if you prefer a speedier approach, pulse them gently in a food processor. Be careful not to over-process them into a nut butter! We want distinct pieces. For peanuts, if they are shelled, you can just add them as is or give them a quick chop if they are very large. This simple preparation step really elevates the final bar by providing varied textures.
2. Combine the Dry Ingredients: In a medium-sized mixing bowl, combine your prepared nuts and the puffed rice. The puffed rice adds a wonderful lightness and a satisfying crunch that contrasts beautifully with the denser nuts. Give these dry ingredients a good stir to ensure they are evenly distributed. This is also where you’ll add the 1/2 teaspoon of sea salt. The salt here is crucial for enhancing the flavors of both the nuts and the chocolate that’s to come. It’s not just about adding a salty taste; it’s about bringin extractg out the depth of all the other ingredients.
3. Create the Binding Mixture: In a separate, smaller bowl, we’ll create our binding liquid. Pour in the 1/4 cup of brown rice syrup. Brown rice syrup is fantastic because it’s not overly sweet and provides a lovely chewy texture without being sticky like honey can sometimes be. Next, add the 1 1/2 teaspoons of vanilla extract. The vanilla adds a warm, aromatic depth that complements the chocolate and nuts perfectly. Stir these two ingredients together until they are well combined. This simple syrup mixture is the magic that will hold everything together.
4. Combine Wet and Dry: Now comes the satisfying part where everything comes together. Pour the brown rice syrup and vanilla mixture over the nut and puffed rice mixture in the larger bowl. Using a sturdy spatula or a wooden spoon, mix everything thoroughly. You want to ensure that every single piece of nut and puffed rice is coated with the sticky, sweet syrup. This might take a minute or two of vigorous stirring, but it’s essential for the bars to hold their shape. Don’t be afraid to really dig in and get everything coated. The mixture will start to clump together.
5. Press and Chill: Line an 8×8 inch baking pan with parchment paper, leaving some overhang on the sides. This will make it incredibly easy to lift the entire slab out of the pan later. Pour your combined nut mixture into the prepared pan. Now, using your hands (lightly greased if you find it too sticky) or the bottom of a flat glass, press the mixture down very firmly and evenly into the pan. The firmer you press, the better your bars will hold together. Once pressed, place the pan in the refrigerator for at least 30 minutes to allow the mixture to firm up. This chilling step is vital before we add the chocolate.
The Chocolatey Crown
This phase is all about the decadent topping!
6. Melt the Chocolate: While your base is chilling, it’s time to prepare the glorious dark chocolate topping. In a microwave-safe bowl, combine the 1 cup of dark chocolate chips with the 2 teaspoons of coconut oil. Coconut oil helps the chocolate melt smoothly and creates a beautiful, glossy finish that hardens nicely. Microwave in 30-second intervals, stirring well after each interval, until the chocolate is completely melted and smooth. Alternatively, you can melt the chocolate using a double boiler over simmering water. Be patient here; you don’t want to scorch the chocolate.
7. Top and Garnish: Once your nut mixture has firmed up in the refrigerator, remove the pan. Pour the melted dark chocolate evenly over the top of the pressed nut mixture. Use your spatula to spread it out to the edges, creating a smooth, even layer. If you’re using the optional flaky salt, sprinkle it generously over the melted chocolate while it’s still wet. The contrast of the dark chocolate and the sparkling crystals of flaky salt is not only beautiful but adds another delightful textural and flavor dimension.
8. Final Chill and Cut: Place the pan back into the refrigerator for at least 1-2 hours, or until the chocolate is completely set and firm. This is the most challengin extractg part – waiting! Once fully chilled, use the parchment paper overhang to lift the entire slab out of the pan. Place it on a cutting board and, using a sharp knife, cut it into your desired bar shapes. You can make them thick and substantial or thinner energy bites. Store these delicious bars in an airtight container in the refrigerator. They’ll keep well for about a week. Enjoy your homemade, perfectly balanced treat!
Conclusion:
You’ve just unlocked the secret to creating incredibly satisfying Dark Chocolate and Sea Salt Nut Bars! These bars are a true delight for anyone seeking a healthier, yet still indulgent, treat. Their perfect balance of rich dark chocolate, crunchy nuts, and that irresistible pop of sea salt makes them incredibly moreish. They’re a fantastic option for a quick breakfast on the go, a post-workout refuel, or an afternoon pick-me-up that satisfies your sweet cravings without the guilt. The simplicity of the recipe means you can whip them up with minimal fuss, making them an ideal choice for both novice and experienced bakers. I truly encourage you to give these Dark Chocolate and Sea Salt Nut Bars a try – you won’t regret it!
For serving, these bars are excellent on their own, but they also pair beautifully with a cup of coffee or tea. You can even crum extractble them over yogurt or ice cream for an extra layer of texture and flavor. Looking for variations? Feel free to experiment with different nuts like pecans or walnuts, or add dried fruits such as cranberries or apricots for a chewy contrast. A sprinkle of chili flakes could add a surprising kick for the adventurous!
Frequently Asked Questions:
Can I make these bars vegan?
Absolutely! To make these Dark Chocolate and Sea Salt Nut Bars vegan, simply ensure you use dairy-free dark chocolate chips or chunks. Most dark chocolate is naturally vegan, but it’s always a good idea to check the ingredients list for any hidden dairy products. All other ingredients in this recipe are typically vegan-friendly.
How should I store these bars?
Store your delicious Dark Chocolate and Sea Salt Nut Bars in an airtight container at room temperature for up to a week. For longer storage, you can keep them in the refrigerator. They also freeze beautifully, so you can make a big batch and have them ready whenever a craving strikes!
What kind of nuts work best?
The beauty of these bars is their versatility! While almonds and cashews are fantastic, feel free to use your favorite nuts or a combination. Walnuts, pecans, and even pistachios would add wonderful flavor and texture. Just ensure they are raw and unsalted, as we add our own sea salt for control over the salinity.
Dark Chocolate and Sea Salt Nut Bars
Chewy and satisfying no-bake bars packed with nuts, puffed rice, and a rich dark chocolate drizzle, finished with a sprinkle of sea salt. A perfect homemade treat.
Ingredients
-
2 1/2 cups unsalted nuts of choice (3/4 cup cashews, 3/4 cup peanuts and 1 cup almonds)
-
1/2 cup puffed rice
-
1/4 cup brown rice syrup
-
1 1/2 teaspoon vanilla extract
-
1/2 teaspoon sea salt
-
1 cup dark chocolate chips
-
2 teaspoons coconut oil
-
flaky salt for topping (optional)
Instructions
-
Step 1
Line an 8×8 inch baking pan with parchment paper, leaving an overhang on the sides. -
Step 2
In a large bowl, combine the nuts and puffed rice. -
Step 3
In a small saucepan, gently warm the brown rice syrup, vanilla extract, and sea salt over low heat until just combined. Do not boil. -
Step 4
Pour the warm syrup mixture over the nut and puffed rice mixture. Stir well to coat everything evenly. -
Step 5
Press the mixture firmly and evenly into the prepared baking pan. -
Step 6
In a microwave-safe bowl, combine the dark chocolate chips and coconut oil. Microwave in 30-second intervals, stirring between each, until smooth and melted. -
Step 7
Drizzle the melted dark chocolate over the pressed nut mixture in the pan. -
Step 8
Sprinkle with flaky salt, if using. -
Step 9
Refrigerate for at least 2 hours, or until firm. Lift the bars out of the pan using the parchment paper and cut into desired portions.
Important Information
Nutrition Facts (Per Serving)
It is important to consider this information as approximate and not to use it as definitive health advice.
Allergy Information
Please check ingredients for potential allergens and consult a health professional if in doubt.