Chocolate Black Bean Brownie Bites-Guilt Free Treat
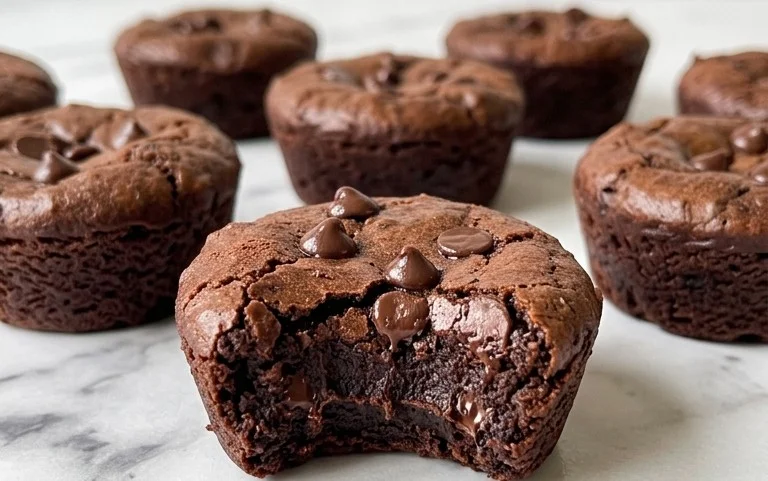
Chocolate Black Bean Brownie Bites are the little bursts of decadent joy you’ve been craving, and believe me, they’re about to become your new obsession. Forget everything you thought you knew about healthy desserts; these little wonders redefine indulgence with a secret ingredient that’s both surprising and incredibly satisfying. Why do we love them so much? Because they deliver that deep, fudgy chocolate flavor and chewy texture without any of the guilt. Imagin extracte biting into a rich, intensely chocolatey brownie that’s also packed with protein and fiber, making them perfect for a guilt-free treat, a post-workout reward, or even a sneaky breakfast option. These Chocolate Black Bean Brownie Bites are special because they prove that you don’t have to sacrifice taste for health. They’re wonderfully moist, incredibly fudgy, and so easy to make, you’ll be whipping them up every week.
Chocolate Black Bean Brownie Bites
Have you ever craved a decadent chocolate treat but wanted to sneak in some hidden goodness? Well, get ready for your new favorite guilt-free indulgence: Chocolate Black Bean Brownie Bites! These little powerhouses are surprisingly fudgy, intensely chocolatey, and packed with nutrients thanks to the star ingredient – black beans. Don’t let the beans fool you; they contribute an incredible moistness and a protein boost without any bean-y flavor. They are perfect for a quick energy boost, a satisfying dessert, or even a sneaky breakfast on the go. I love that they are naturally gluten-free and can easily be made vegan with a few simple swaps. Plus, the “bite” size makes them perfect for portion control, though I often find myself reaching for more than one! Let’s dive into how we can create these magical morsels.
Ingredients:
Getting Started: The Foundation of Flavor
The first crucial step is preparing your black beans. If you’re using canned black beans, make sure to rinse them very thoroughly. This is key to washing away any residual “canned” flavor. Drain them well and pat them dry with a paper towel. The drier the beans, the smoother your brownie batter will be. If you’re cooking your own black beans, ensure they are soft and well-cooked. This is where the magic begin extracts!
Blending the Base: Creating the Fudgy Texture
In a food processor or a high-powered blender, combine your rinsed and drained black beans. The goal here is to achieve a very smooth, paste-like consistency. Blend them until there are no discernible whole beans left. This might take a minute or two, and you may need to scrape down the sides of the food processor a few times to ensure everything is incorporated. Once you have a smooth purée, it’s time to add the liquid ingredients. Pour in your pure maple syrup (or your chosen sweetener), your oil or nut butter (almond or peanut butter adds a lovely depth of flavor and richness), and the pure vanilla extract. Blend again until everything is well combined and the mixture is smooth and creamy. This forms the fudgy base of our brownie bites.
Incorporating the Dry Ingredients: The Rise and Richness
Now, let’s add the dry elements that will give our brownie bites structure and that classic brownie flavor. To the blended wet ingredients, add the regular cocoa powder and the Dutch cocoa powder. Using both types of cocoa powder will give you a more complex and richer chocolate flavor. If you only have regular cocoa powder, don’t worry, just use the full 3 tablespoons of regular. Next, add the rolled oats. These will help bind the ingredients and give a slight chegrape juicess. Finally, add the salt and the baking powder. The salt is essential for enhancing the chocolate flavor and balancing the sweetness. The baking powder is what will give our bites a little lift. Pulse the food processor a few times to just combine the dry ingredients into the wet. Be careful not to overmix at this stage; we don’t want to develop the oat gluten too much.
The Grand Finnon-alcoholic ale: Chocolate Chips and Forming the Bites
At this point, your batter should be thick and incredibly tempting! Now for the best part – the chocolate chips! Add about half of your mini chocolate chips to the batter. Gently fold them in using a spatula or by pulsing the food processor just a couple of times. You want some of the chips to melt slightly into the batter, creating pockets of gooey chocolate, while others will remain whole for a delightful textural contrast. Reserve the remaining chocolate chips for topping, if desired.
Now, let’s get ready to bake. Preheat your oven to 350 degrees Fahrenheit (175 degrees Celsius). Line a mini muffin tin with liners or grease it well. This recipe makes about 24 mini brownie bites. Using a small cookie scoop or two spoons, portion the batter evenly into the prepared mini muffin cups. If you like, press a few of the reserved mini chocolate chips onto the top of each brownie bite before baking. This adds a beautiful visual appeal and an extra burst of chocolate.
Baking and Cooling: The Patience Game
Place the mini muffin tin in the preheated oven. Bake for approximately 15-20 minutes. The exact baking time will depend on your oven. You’ll know they’re ready when the edges are set and a toothpick inserted into the center comes out with moist crum extractbs attached, but not wet batter. Be careful not to overbake them, as this can lead to dry brownie bites.
Once baked, remove the muffin tin from the oven and let the brownie bites cool in the tin for about 10-15 minutes. This is a crucial step to allow them to set and firm up. After they’ve cooled slightly in the tin, carefully transfer them to a wire rack to cool completely. These brownie bites are delicious served warm, but they are also fantastic at room temperature or chilled. Store any leftovers in an airtight container at room temperature for up to 3 days, or in the refrigerator for up to a week. Enjoy these fudgy, chocolatey wonders!

Conclusion:
I hope you’re as excited to whip up these Chocolate Black Bean Brownie Bites as I am to eat them! These little bites of pure joy are a fantastic testament to how healthy ingredients can deliver incredible flavor and texture. They’re naturally gluten-free and packed with plant-based protein thanks to the humble black bean, making them a guilt-free indulgence you can feel good about. Whether you’re looking for a healthier dessert option, a pre-workout treat, or just a delicious way to satisfy your sweet tooth, these brownie bites are a winner.
For serving, I love enjoying them simply on their own for a quick and satisfying snack. They’re also wonderful warmed up slightly and served with a dollop of dairy-free yogurt or a sprinkle of fresh berries. For variations, feel free to stir in some chopped nuts like walnuts or pecans for added crunch, or even a handful of dark chocolate chips for an extra chocolatey punch. Don’t be afraid to experiment with different extracts like almond or peppermint to give them a unique twist! I truly encourage you to give these Chocolate Black Bean Brownie Bites a try – I’m confident you’ll be pleasantly surprised by how decadent and delicious they are.
Frequently Asked Questions:
Can I taste the black beans in these brownie bites?
Not at all! The beans are blended so smoothly that they contribute a wonderful fudgy texture and moisture without imparting any bean-like flavor. The rich chocolate and sweetness completely mask any subtle earthy notes.
How should I store these brownie bites?
I recommend storing them in an airtight container at room temperature for up to 3 days, or in the refrigerator for up to a week. They also freeze beautifully, making them perfect for making ahead!
Can I make these vegan?
Yes! This recipe is already naturally vegan if you use plant-based chocolate chips and no egg substitutes are needed as the black beans provide excellent binding.
Chocolate Black Bean Brownie Bites
Deliciously fudgy and healthy brownie bites made with black beans and chocolate for a guilt-free treat.
Ingredients
-
2 tbsp regular cocoa powder
-
1 tbsp Dutch cocoa powder
-
1/3 cup rolled oats
-
1 can black beans, rinsed and drained
-
1/4 tsp salt
-
1/2 cup pure maple syrup
-
1/4 cup oil
-
2 tsp pure vanilla extract
-
1/2 tsp baking powder
-
1/2 cup mini chocolate chips
Instructions
-
Step 1
Preheat your oven to 350°F (175°C). Lightly grease a mini muffin tin or line with mini muffin liners. -
Step 2
In a food processor, combine the rinsed and drained black beans, maple syrup, oil, and vanilla extract. Process until smooth, scraping down the sides as needed. -
Step 3
Add the regular cocoa powder, Dutch cocoa powder, rolled oats, salt, and baking powder to the food processor. Process until just combined, being careful not to overmix. -
Step 4
Gently fold in the mini chocolate chips. -
Step 5
Spoon the batter into the prepared mini muffin cups, filling each about two-thirds full. -
Step 6
Bake for 18-20 minutes, or until a toothpick inserted into the center comes out with moist crumbs attached. -
Step 7
Let the brownie bites cool in the tin for a few minutes before transferring them to a wire rack to cool completely.
Important Information
Nutrition Facts (Per Serving)
It is important to consider this information as approximate and not to use it as definitive health advice.
Allergy Information
Please check ingredients for potential allergens and consult a health professional if in doubt.