Best Banana Pudding Recipe-Easy & Delicious Treat
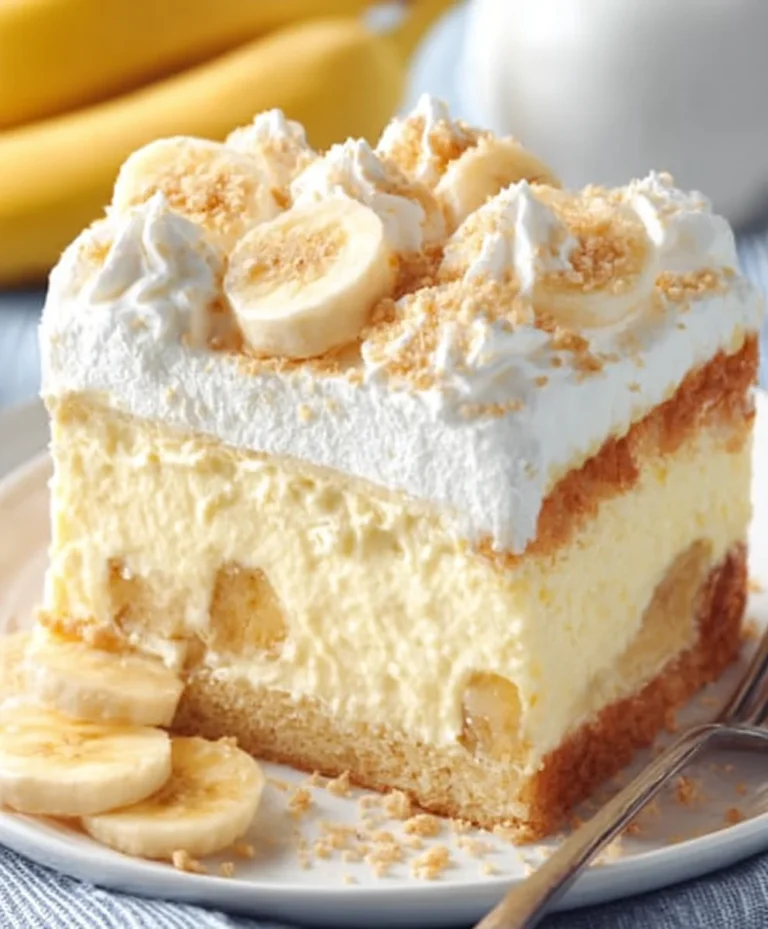
Banana Pudding is a comforting classic for a reason, and today we’re diving deep into what makes this creamy, dreamy dessert so universally adored. It’s more than just a simple sweet treat; it’s a hug in a bowl, evoking memories of childhood kitchens and lazy Sunday afternoons. What’s not to love about layers of tender vanilla wafers, luscious custard, and sweet, ripe bananas, all topped with a fluffy meringue or a cloud of whipped cream? The magic lies in its deceptive simplicity. Yet, there’s a certain art to achieving that perfect balance of textures and flavors, a delicate dance between the soft cookies, the smooth pudding, and the fresh fruit. This recipe unlocks those secrets, ensuring your Banana Pudding is not just good, but truly unforgettable. Prepare to fall in love with this beloved dessert all over again!
Ingredients:
- 1 (3.4 oz) box instant vanilla pudding mix
- 2 cups cold milk
- 1 (14 oz) can sweetened condensed milk
- 1 teaspoon vanilla extract
- 1 (8 oz) tub whipped topping, thawed
- 4-5 ripe bananas, sliced
- 1 (11 oz) box vanilla wafers
Preparing the Pudding Base
Step 1: Combine Pudding Mix and Milk
The foundation of our delicious Banana Pudding is a creamy, smooth pudding. To start, grab a medium-sized mixing bowl. Pour the entire contents of the (3.4 oz) box of instant vanilla pudding mix into the bowl. Next, measure out 2 cups of cold milk and add it directly to the pudding mix. It’s crucial that the milk is cold, as this helps the pudding set properly and prevents a grainy texture. Using milk that’s too warm can result in a pudding that never quite reaches its desired consistency.
Step 2: Whisk to Perfection
Now comes the whisking! Using a wire whisk, vigorously beat the pudding mix and milk together for about 2 minutes. You’ll notice the mixture will start to thicken almost immediately. Continue whisking until there are no lumps and the mixture is smooth and creamy. Don’t stop too soon; thorough whisking is key to achieving that classic pudding texture. Once you’ve reached a smooth consistency, let the pudding mixture sit for about 5 minutes to allow it to set up further. This brief resting period is important for the pudding to thicken to the perfect level before we incorporate other ingredients.
Adding Richness and Flavor
Step 3: Enrich the Pudding Base
After the pudding has set for its initial 5 minutes, it’s time to elevate its flavor and texture. Open your (14 oz) can of sweetened condensed milk and pour the entire can into the bowl with the thickened pudding. Sweetened condensed milk adds an incredible richness and a subtle caramel-like sweetness that complements the vanilla beautifully. Next, add 1 teaspoon of vanilla extract. While the instant pudding mix already has vanilla flavor, an extra splash of pure vanilla extract really amplifies the aroma and depth of the dessert.
Step 4: Fold in the Whipped Topping
Gently fold in the thawed (8 oz) tub of whipped topping. It’s important that the whipped topping is fully thawed but not melted into liquid. You want it to be light and airy. Use a spatula to carefully incorporate the whipped topping into the pudding and sweetened condensed milk mixture. Avoid overmixing, as this can deflate the whipped topping and make the pudding less light. The goal is to create a uniform, fluffy mixture that’s light and airy, not dense. Stir just until no streaks of white whipped topping remain. This step transforms the denser pudding into a light and luscious cream.
Assembling the Banana Pudding
Step 5: Layering the Flavors
Now for the fun part – assembly! Select a beautiful serving dish, such as a trifle bowl or a 9×13 inch baking dish. Begin extract by spreading a thin layer of the prepared creamy pudding mixture on the bottom of your dish. Next, arrange a single layer of sliced ripe bananas over the pudding. The riper the bananas, the sweeter and more flavorful they will be, contributing wonderfully to the overall taste of the Banana Pudding. Once the bananas are in place, add a layer of vanilla wafers. You can break some of them in half to fill any gaps and ensure a good coverage. Repeat these layers: pudding, bananas, and vanilla wafers, until all your ingredients are used, finishing with a final layer of the creamy pudding mixture on top. This meticulous layering is what gives each spoonful of Banana Pudding its delightful combination of textures and flavors.
Step 6: Chilling for Maximum Deliciousness
Once your Banana Pudding is beautifully layered, cover the dish tightly with plastic wrap. It’s essential to refrigerate the pudding for at least 4 hours, but overnight is even better. This chilling period allows all the flavors to meld together perfectly, the vanilla wafers to soften slightly, and the entire dessert to firm up into a cohesive and delightful treat. The softened wafers become wonderfully cake-like, creating a delightful contrast with the creamy pudding and sweet bananas. Before serving, you can optionally garnish the top with a few extra vanilla wafers, some sliced bananas, or a dollop of whipped cream for an extra touch of elegance. Enjoy the fruits of your labor!
Conclusion:
I hope you’ve enjoyed diving into the delightful world of making this incredible Banana Pudding! This recipe is a true crowd-pleaser, perfect for any occasion, from a casual family dinner to a festive gathering. We’ve walked through each step together, ensuring you have all the knowledge to create a smooth, creamy, and utterly delicious dessert. The balance of ripe bananas, rich custard, and crisp vanilla wafers is simply divine. Don’t be afraid to experiment and make it your own!
This Banana Pudding is fantastic served chilled, straight from the refrigerator. For an elevated presentation, consider garnishing with extra whipped cream, a sprinkle of crushed vanilla wafers, or even a few fresh banana slices. It pairs wonderfully with a glass of milk or a light, refreshing iced tea.
Feeling adventurous? Try adding a touch of cinnamon to the custard for a warm, spiced note, or fold in some chocolate chips for a decadent twist. For a dairy-free version, experiment with coconut milk or almond milk and vegan vanilla wafers. The possibilities are endless! Now, go forth and create your own perfect Banana Pudding! I’m confident you’ll fall in love with the results.
FAQs
Can I make this Banana Pudding ahead of time?
Absolutely! This Banana Pudding is actually best made a few hours in advance, or even the day before. This allows the flavors to meld beautifully and the wafers to soften just the right amount, creating that signature creamy texture. Just be sure to cover it tightly with plastic wrap before refrigerating to prevent any freezer burn or absorption of other fridge odors.
What kind of bananas should I use for the best flavor?
For the optimal flavor in your Banana Pudding, it’s best to use ripe to slightly overripe bananas. They will be sweeter and have a more intense banana flavor. Look for bananas with plenty of brown spots on their peel; these are often at their peak sweetness and will mash easily, incorporating seamlessly into the pudding. Avoid using green or slightly yellow bananas, as they won’t contribute as much flavor or sweetness.
Can I use store-bought pudding mix instead of making it from scratch?
While this recipe focuses on a homemade custard for the richest flavor, you can certainly use a good quality store-bought vanilla pudding mix if you’re short on time. Follow the package instructions for preparation, and then proceed with layering the pudding, bananas, and wafers as outlined in the recipe. The texture might be slightly different, but it will still result in a delicious Banana Pudding!
Best Banana Pudding Recipe-Easy & Delicious Treat
A simple and delicious recipe for classic banana pudding featuring layers of creamy pudding, sweet bananas, and soft vanilla wafers.
Ingredients
-
1 (3.4 oz) box instant vanilla pudding mix
-
2 cups cold milk
-
1 (14 oz) can sweetened condensed milk
-
1 teaspoon vanilla extract
-
1 (8 oz) tub whipped topping, thawed
-
4-5 ripe bananas, sliced
-
1 (11 oz) box vanilla wafers
Instructions
-
Step 1
In a medium bowl, combine the instant vanilla pudding mix and cold milk. Whisk vigorously for about 2 minutes until smooth and creamy, with no lumps. Let the mixture sit for 5 minutes to thicken. -
Step 2
Add the sweetened condensed milk and vanilla extract to the thickened pudding. Stir to combine. -
Step 3
Gently fold in the thawed whipped topping using a spatula until just combined and the mixture is light and fluffy. Avoid overmixing. -
Step 4
To assemble, spread a thin layer of the pudding mixture in the bottom of your serving dish. Layer with sliced bananas, then vanilla wafers. Repeat layers until all ingredients are used, finishing with a layer of pudding on top. -
Step 5
Cover the dish tightly with plastic wrap and refrigerate for at least 4 hours, or preferably overnight, to allow flavors to meld and wafers to soften.
Important Information
Nutrition Facts (Per Serving)
It is important to consider this information as approximate and not to use it as definitive health advice.
Allergy Information
Please check ingredients for potential allergens and consult a health professional if in doubt.