Air Fryer Garlic Bread-Quick Tortilla Hack
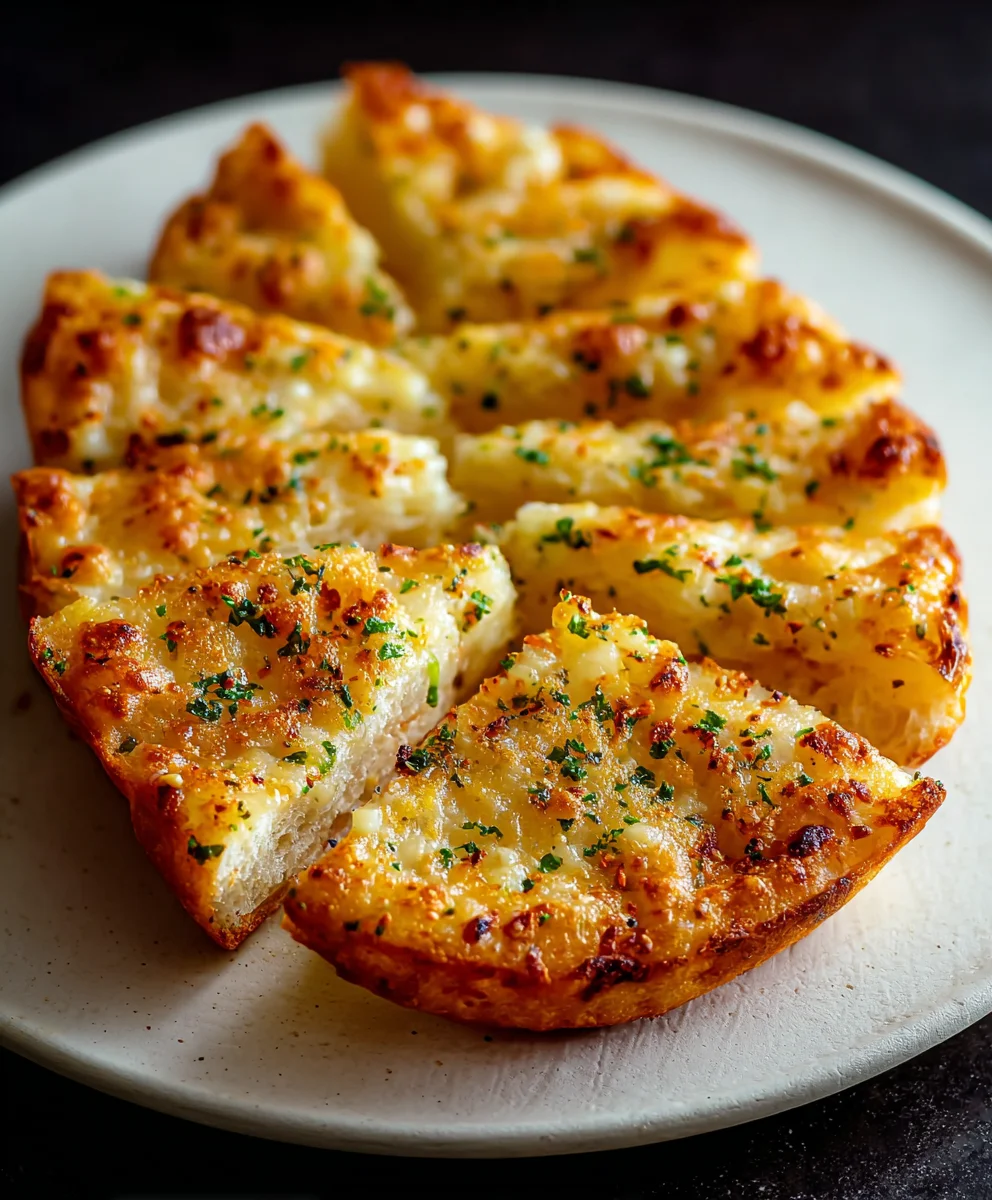
Quick Air Fryer Tortilla Garlic Bread is the game-changer you didn’t know you needed for those busy weeknights or impromptu snack attacks. Imagin extracte sinking your teeth into a perfectly crisp, golden-brown slice, bursting with fragrant garlic and a satisfying crunch – all made in a fraction of the time it takes for traditional garlic bread. It’s no wonder this ingenious creation has taken kitchens by storm! People adore it for its incredible speed and the way it transforms humble tortillas into a gourmet-tasting side dish or appetizer. What truly sets this Quick Air Fryer Tortilla Garlic Bread apart is its delightful texture; the air fryer creates an almost impossibly crispy exterior that gives way to a soft, chewy center, a delightful contrast that’s utterly addictive. Plus, it’s ridiculously simple to whip up, proving that delicious can also be incredibly convenient.

Ingredients:
- 2 flour tortilla shells
- 1 tablespoon butter, softened
- ½ cup grated mozzarella cheese
- Garlic powder, to taste
- Italian seasoning, to taste
- Fresh parsley, chopped (optional, for garnish)
Preparing Your Tortilla Garlic Bread
Gathering and Prepping Ingredients
Before we dive into the quick and easy assembly, let’s ensure all our components are ready. Having everything measured out and within reach will make the cooking process incredibly smooth. First, take your two flour tortilla shells and lay them flat on your clean work surface. Make sure they aren’t torn or damaged, as this will affect the final presentation. Next, grab your tablespoon of butter. It’s crucial that the butter is softened. If it’s too hard, it will be difficult to spread evenly. You can achieve this by leaving it out on the counter for about 30-60 minutes, or by microwaving it for just a few seconds at a time, being careful not to melt it completely. You want it pliable, not liquid. Measure out your ½ cup of grated mozzarella cheese. Pre-shredded cheese is perfectly fine for this recipe, but if you have a block of mozzarella, grating it fresh often yields a better melt. For seasonings, have your garlic powder and Italian seasoning ready. These are “to taste,” so you can adjust the amount based on your personal preference for garlic and herb intensity. Finally, if you’re opting for the garnish, chop your fresh parsley. Wash and dry the parsley thoroughly before chopping to ensure it’s clean and doesn’t add excess moisture.
Assembling the Tortilla Garlic Bread
Applying the Butter and Seasonings
Now comes the fun part – transforming these simple ingredients into something delicious! Start with one of your tortilla shells. Using a butter knife or a small spatula, spread the softened butter evenly across the entire surface of the tortilla. You want a nice, consistent layer from edge to edge. Don’t be shy with the butter; it’s what will help the tortilla get crispy and golden brown, and it acts as the binder for our seasonings. Once the butter is spread, it’s time to season. Sprinkle a generous amount of garlic powder over the buttered surface. Remember, this is “to taste,” so start with a good amount and you can always add more if you like. Follow this with a sprinkle of Italian seasoning. The combination of garlic and Italian herbs is classic and incredibly satisfying. Aim for an even distribution so every bite has that wonderful flavor profile. Repeat this entire buttering and seasoning process for the second tortilla shell. It’s important to season both sides of each tortilla if you want maximum flavor, but for simplicity and a quicker cook, seasoning one side is often sufficient and still yields great results.
Adding the Cheese and Combining
With both tortillas buttered and seasoned, it’s time to add the cheese. Take one of the seasoned tortillas and sprinkle ½ cup of the grated mozzarella cheese evenly over the seasoned side. Ensure the cheese covers most of the surface, getting close to the edges. The mozzarella will melt beautifully, creating a gooey, cheesy layer that complements the garlic and herbs perfectly. Now, take the second seasoned tortilla and place it, seasoned-side down, on top of the cheese-covered tortilla. This creates a delicious sandwich. Gently press down on the top tortilla to help the cheese adhere slightly and to ensure the two tortillas are well-joined. You should now have two tortillas stacked together, with the cheese trapped in the middle. If any cheese has spilled out from the sides, that’s perfectly fine; it will crisp up in the air fryer and add to the deliciousness.
Cooking the Quick Air Fryer Tortilla Garlic Bread
Air Frying Phase One: Crisping the Bottom
Now that your tortilla garlic bread is assembled, it’s time to get it into the air fryer. Preheat your air fryer to 375°F (190°C) for about 3-5 minutes. This preheating step is vital for ensuring an even cook and achieving that desired crispy texture. Carefully place one assembled tortilla garlic bread into the air fryer basket. If your air fryer is smaller, you may only be able to cook one at a time, which is perfectly acceptable. We want to ensure there’s enough space around the tortilla for the hot air to circulate effectively. Air fry for approximately 3-4 minutes. During this initial phase, the goal is to start crisping up the bottom tortilla and to begin extract melting the cheese. You’ll want to keep an eye on it, as tortilla shells can brown quickly. The butter will start to work its magic, creating a slightly golden hue.
Air Frying Phase Two: Flipping and Finishing
After the first 3-4 minutes, carefully open the air fryer basket. Using a spatula or tongs, gently flip the tortilla garlic bread over. You should see a nice golden-brown color developing on the bottom, and the cheese should be starting to soften and melt. Now, continue to air fry for another 3-4 minutes. This second phase focuses on crisping up the other side and ensuring the cheese is fully melted and gooey. Again, monitor it closely. Some air fryers run hotter than others, so adjust the time as needed. The goal is a golden-brown, crispy tortilla on both sides with perfectly melted cheese oozing out slightly. Once it looks golden and the cheese is bubbling, carefully remove the tortilla garlic bread from the air fryer basket.
Serving and Garnish
Once removed from the air fryer, transfer your Quick Air Fryer Tortilla Garlic Bread to a cutting board. If you chopped fresh parsley earlier, now is the time to sprinkle it over the top. The vibrant green of the parsley not only adds a lovely visual appeal but also a fresh, herbaceous counterpoint to the rich, garlicky, cheesy bread. Allow it to cool for just a minute or two before slicing. Tortilla garlic bread is best enjoyed warm, so don’t wait too long! You can cut it into wedges, strips, or even squares, depending on how you plan to serve it. It’s fantastic on its own as a snack, or it makes an excellent side dish to soups, salads, or pasta. Enjoy the delightful crunch and the burst of garlic and cheese in every bite!
Conclusion:
There you have it – your guide to crafting the incredibly simple yet undeniably delicious Quick Air Fryer Tortilla Garlic Bread! This recipe proves that you don’t need a lot of time or fancy ingredients to create a satisfying and flavorful side dish. The crispy texture achieved in the air fryer is truly something special, and the garlic and herb infusion is simply irresistible. I hope you enjoy making and serving this versatile treat as much as I do. Don’t be afraid to experiment with the seasonings – it’s all about making it your own!
For serving suggestions, this Quick Air Fryer Tortilla Garlic Bread is a fantastic accompaniment to pasta dishes, hearty soups, chili, or even just as a stand-alone snack. Cut it into triangles or strips for easy dipping. When it comes to variations, consider adding a sprinkle of Parmesan cheese before air frying for an extra cheesy kick, or a pinch of red pepper flakes for a hint of heat. You could also experiment with different dried herbs like rosemary or oregano.
Frequently Asked Questions about Quick Air Fryer Tortilla Garlic Bread:
Can I use a different type of bread or base for this recipe?
While this recipe is specifically designed for tortillas to achieve a unique crispy texture, you could adapt the seasoning and butter mixture for other flatbreads or even sliced bread. However, the cooking time and results will likely vary.
How should I store any leftover Quick Air Fryer Tortilla Garlic Bread?
For best results, it’s recommended to enjoy this Quick Air Fryer Tortilla Garlic Bread fresh. If you do have leftovers, store them in an airtight container at room temperature for a day. Reheat briefly in the air fryer or oven to restore some crispiness, though it won’t be quite as fresh.
Can I make this recipe ahead of time?
It’s best to prepare and air fry this Quick Air Fryer Tortilla Garlic Bread just before serving to ensure optimal crispiness. The butter and seasoning mixture can be prepared a day in advance and stored in the refrigerator, but the tortillas should be seasoned and air-fried right before you plan to eat them.
Air Fryer Garlic Bread-Quick Tortilla Hack
A super fast and easy way to make crispy garlic bread using tortillas and an air fryer.
Ingredients
-
2 flour tortilla shells
-
1 tablespoon butter, softened
-
1/2 cup grated mozzarella cheese
-
Garlic powder, to taste
-
Italian seasoning, to taste
-
Fresh parsley, chopped (optional, for garnish)
Instructions
-
Step 1
Lay two flour tortilla shells flat. Soften butter. Measure out cheese and seasonings. Chop parsley if using. -
Step 2
Spread softened butter evenly over one side of each tortilla. Sprinkle generously with garlic powder and Italian seasoning. -
Step 3
On one seasoned tortilla, sprinkle ½ cup of grated mozzarella cheese evenly. Place the second seasoned tortilla, seasoned-side down, on top of the cheese. -
Step 4
Preheat air fryer to 375°F (190°C) for 3-5 minutes. Carefully place the assembled tortilla garlic bread into the air fryer basket. -
Step 5
Air fry for 3-4 minutes until the bottom is starting to crisp. Flip the tortilla garlic bread. -
Step 6
Continue to air fry for another 3-4 minutes until golden brown and the cheese is fully melted and bubbly. -
Step 7
Remove from air fryer, sprinkle with fresh parsley (if using), let cool slightly, and slice to serve.
Important Information
Nutrition Facts (Per Serving)
It is important to consider this information as approximate and not to use it as definitive health advice.
Allergy Information
Please check ingredients for potential allergens and consult a health professional if in doubt.