Bunny Cake Recipe – Easy & Adorable Easter Treat
This Bunny Rabbit Cake is more than just a dessert; it’s a delightful journey into pure, unadulterated joy. Imagin extracte the squeals of delight from little ones, or the nostalgic smiles of adults as this charming creation graces the dessert table. There’s something undeniably magical about a cake shaped and decorated to resemble a friendly bunny. It’s the perfect centerpiece for Easter celebrations, spring birthdays, or any occasion that calls for a touch of whimsical sweetness. People absolutely adore this Bunny Rabbit Cake because it captures the imagin extractation, bringin extractg a beloved character to life in edible form. What truly makes this particular Bunny Rabbit Cake special is its approachable design, allowing even novice bakers to achieve a show-stopping result that will be cherished for years to come. Get ready to hop into some baking fun!
Bunny Rabbit Cake
There’s something undeniably magical about a bunny rabbit cake, especially for little ones’ birthdays or Easter celebrations. It’s a showstopper that’s surprisingly achievable, and the look on someone’s face when they see a fluffy, edible bunny is absolutely priceless. This recipe breaks down the process into simple, manageable steps, so even if you’re not a seasoned baker, you can create a delightful masterpiece. We’ll be making a delicious vanilla cake as the base, perfectly suited for decorating. Get ready for some baking fun!
Ingredients:
Preparing the Cake Batter
The foundation of any great cake is a well-made batter. We want a tender, moist crum extractb that holds its shape beautifully for decorating. First, gather all your ingredients and make sure they are at room temperature. This is crucial for a smooth batter. In a medium bowl, whisk together the all-purpose flour, baking powder, and salt. This dry mixture will be added to the wet ingredients later. In a large bowl, cream together the softened unsalted butter and granulated sugar until the mixture is light and fluffy. This step incorporates air, which helps with the cake’s texture. You can use an electric mixer for this, which makes it much easier. Gradually beat in the three large eggs, one at a time, ensuring each egg is fully incorporated before adding the next. This ensures a stable emulsion. Stir in the vanilla extract.
Now, we’ll alternate adding the dry ingredients and the milk to the butter-sugar-egg mixture. Start by adding about one-third of the flour mixture and mix on low speed until just combined. Then, add half of the milk and mix again. Repeat this process, adding another third of the flour mixture, the remaining milk, and finally, the last of the flour mixture. Be careful not to overmix at this stage. Overmixing can develop the gluten in the flour too much, resulting in a tough cake. Mix only until the flour streaks disappear. The batter should be smooth and pourable.
Baking the Bunny Components
For our bunny, we’ll need two different sized bowls to create the body and the head. A 2-quart oven-safe bowl will be perfect for the bunny’s body, and a 1-quart oven-safe bowl will serve as the head. If you don’t have oven-safe bowls, you can use standard cake pans and cut out the shapes later, but using bowls gives us a nice rounded form right from the start. Grease and flour both bowls generously to prevent sticking. This is a critical step to ensure your cake comes out cleanly. You can also use baking spray with flour. Divide the batter evenly between the prepared bowls. The batter will fill them about two-thirds of the way full.
Preheat your oven to 350°F (175°C). Place the bowls on a baking sheet for easier handling and to catch any potential drips. Bake the larger bowl (body) for approximately 35-45 minutes, and the smaller bowl (head) for about 30-40 minutes. The baking time will vary depending on your oven and the size of your bowls. To check for doneness, insert a wooden skewer or toothpick into the center of the cakes. If it comes out clean, the cakes are ready. Let the cakes cool in their bowls for about 15-20 minutes before inverting them onto a wire rack to cool completely. It’s very important that the cakes are entirely cool before you attempt to frost them, otherwise, the frosting will melt.
Creating the Fluffy Frosting
While our cakes are cooling, we can get started on the frosting. This will be a classic buttercream that’s stable enough for decorating. In a large bowl, cream together the softened ½ cup of butter until it’s smooth and creamy. Gradually add the powdered sugar, about a cup at a time, mixing on low speed until incorporated. Once all the powdered sugar is added, increase the speed to medium-high and beat for another 3-5 minutes until the frosting is light and fluffy. This aeration is key for a good texture.
In a small bowl, whisk together the ½ cup of milk and the teaspoon of vanilla extract. Gradually add this liquid mixture to the butter and sugar mixture, one tablespoon at a time, beating until the frosting reaches your desired consistency. You might not need all the liquid, or you might need a tiny bit more. The goal is a smooth, spreadable frosting that isn’t too stiff or too runny. If the frosting is too thick, add a touch more milk. If it’s too thin, add a little more powdered sugar. For our bunny, we’ll want a good amount of frosting to cover the entire cake.
Assembling and Decorating Your Bunny
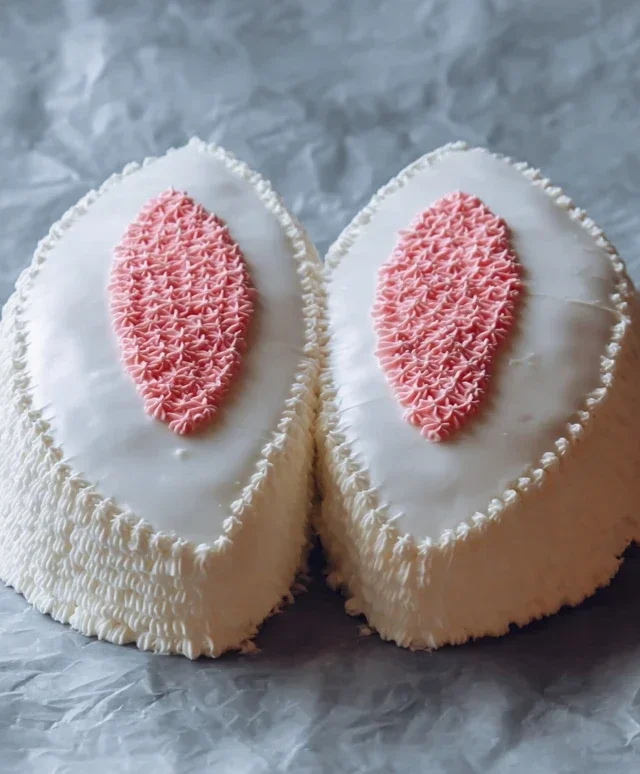
Once your cakes are completely cool, it’s time for the fun part! Place the larger cake (body) on your serving platter. If your cakes have a dome, you can carefully level them with a serrated knife to create a flat surface. Place the smaller cake (head) on top of the body, slightly towards the front. Now, it’s time to frost. Use an offset spatula to generously spread the white frosting all over the body and head, creating a smooth, even layer. This is your bunny’s fluffy fur.
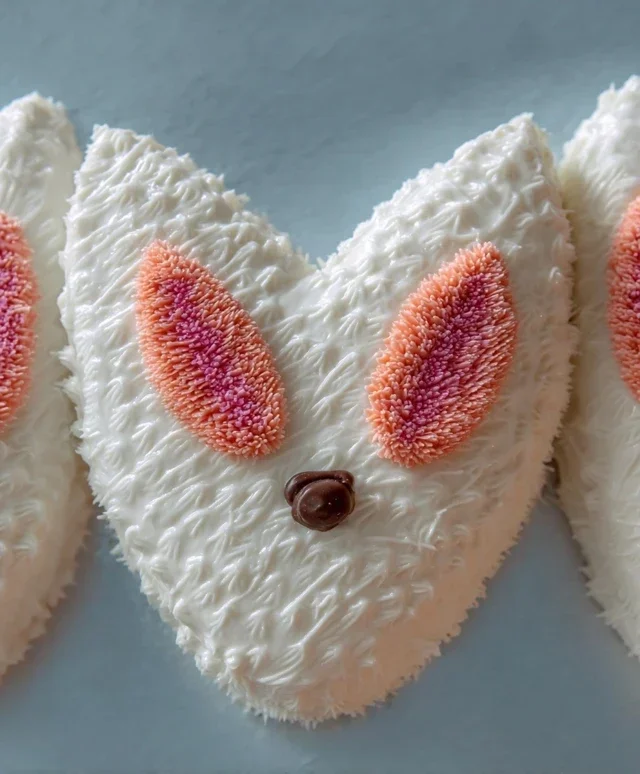
Now, let’s add some bunny details! For the ears, you can use two large cookies, cutouts from fondant, or even more cake if you have any extra. Frost these separately and attach them to the head. For the nose and inner ears, you can use a small amount of pink frosting, or even a jelly bean. Brown frosting can be used to create a tail by piping small dots, or you can use a marshmallow or a pom-pom style decoration. Chocolate chips make excellent eyes, or you can use candy eyes. If you want a more realistic bunny, you can lightly dust the frosted cake with shredded coconut to mimic fur. Get creative with your decorations – this is where your bunny truly comes to life!
Conclusion:
I hope you’re as excited as I am to try this delightful Bunny Rabbit Cake recipe! It’s truly a showstopper, perfect for Easter, spring birthdays, or any occasion where a touch of whimsy is needed. The combination of a moist, flavorful cake with adorable fondant or frosting details makes it a guaranteed hit with both kids and adults. This cake isn’t just about looks; it tastes fantastic too, offering a satisfying sweetness that complements any celebration. I’m confident you’ll find this recipe incredibly rewarding and fun to make.
For serving, consider pairing a slice of your bunny masterpiece with fresh berries and a dollop of whipped cream for a light and refreshing contrast. If you’re feeling adventurous, you could even try different cake flavors like lemon or carrot cake to give your Bunny Rabbit Cake a unique twist. Don’t be afraid to experiment with edible glitter or sprinkles for extra sparkle!
So, gather your ingredients, put on your apron, and let’s get baking! I encourage you to give this recipe a try; the joy on people’s faces when they see this cake is absolutely priceless.
Frequently Asked Questions:
Can I make this cake ahead of time?
Absolutely! You can bake and fully frost the cake up to a day in advance. Store it in an airtight container at room temperature. If you’re decorating with fondant, it’s best to decorate the day of serving for the freshest look.
What if I’m not good at decorating?
Don’t worry! This Bunny Rabbit Cake can be simplified. You can use pre-made candy eyes and a few strategically placed candies for the nose and mouth. Even a simple dusting of powdered sugar can create a snowy effect, and you can add pipe cleaner ears for an easy finish!
What kind of frosting works best for decorating the bunny?
A stable buttercream frosting, like a Swiss meringue or American buttercream, is ideal for piping and holding its shape. For a smoother finish, ganache or fondant are excellent choices. Fondant offers the most versatility for sculpting.
Bunny Rabbit Cake
A whimsical cake shaped like a bunny, perfect for Easter or any celebration. This recipe uses readily available ingredients and is designed to be fun to make and decorate.
Ingredients
-
2 cups all-purpose flour
-
1.5 cups granulated sugar
-
1 teaspoon baking soda
-
0.5 teaspoon salt
-
1 cup unsweetened applesauce
-
0.5 cup vegetable oil
-
2 large eggs
-
1 teaspoon vanilla extract
-
1 cup buttermilk
Instructions
-
Step 1
Preheat oven to 350°F (175°C). Grease and flour a bunny-shaped cake pan or two 8-inch round cake pans. -
Step 2
In a large bowl, whisk together the flour, sugar, baking soda, and salt. -
Step 3
In a separate bowl, whisk together the applesauce, vegetable oil, eggs, and vanilla extract. -
Step 4
Gradually add the wet ingredients to the dry ingredients, alternating with the buttermilk, beginning and ending with the dry ingredients. Mix until just combined; do not overmix. -
Step 5
Pour the batter into the prepared cake pan(s). If using round pans, you will need to assemble the bunny shape later. Bake for 30-35 minutes, or until a wooden skewer inserted into the center comes out clean. -
Step 6
Let the cake(s) cool in the pan for 10 minutes before inverting onto a wire rack to cool completely. Once cooled, frost and decorate as desired to resemble a bunny.
Important Information
Nutrition Facts (Per Serving)
It is important to consider this information as approximate and not to use it as definitive health advice.
Allergy Information
Please check ingredients for potential allergens and consult a health professional if in doubt.